
Arduino Sensor Shield v5.0
A stacking expansion shield that converts Arduino pins into convenient 3-pin headers for rapid prototyping.
Component Preview
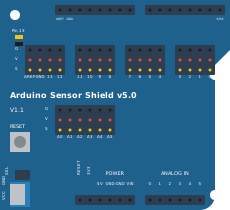 Sensor Shield
The Sensor Shield simply sits on top of an Arduino Uno or Mega. It takes every single digital and analog pin from the underlying board and breaks it out into a "VCC, GND, Signal" 3-pin cluster. This allows you to plug servo motors and sensor modules directly into the board without needing a breadboard.
Overview
When building robots or complex projects with many sensors, routing dozens of power wires across a breadboard can become a tangled mess. The Sensor Shield solves this by providing dedicated power and ground pins right next to every signal pin.
Pin Reference (Simplified)
| Pin Type | Type | Description |
|---|---|---|
| S_0 to S_13 | digital | The Signal (S) pins correspond directly to Arduino Digital pins D0-D13. |
| S_A0 to S_A5 | analog | The Signal (S) pins correspond directly to Arduino Analog pins A0-A5. |
| V_x | power | The Voltage (V) row provides 5V power to every triplet block. |
| G_x | power | The Ground (G) row provides Ground to every triplet block. |
| AREF, 3V3, 5V, GND | power | Standard Arduino pass-through pins. |
Configurable Attributes
This component acts purely as a physical routing interface and has no configurable attributes.
Working Principle
This shield contains no logic chips, microcontrollers, or active components. It is merely a carefully designed PCB that routes the Arduino's 5V and GND traces to dozens of header pins, pairing them with the standard I/O traces.
Wiring Diagram
- The Sensor Shield is meant to be stacked directly on top of an Arduino Uno.
- Standard 3-pin modules (like a servo motor) come with a female cable that has Signal, VCC, and GND.
- Plug the female cable directly into the vertical columns on the Sensor Shield. Pay attention to polarity:
Gis ground (black/brown wire),Vis voltage (red wire), andSis signal (yellow/white wire).
Example Arduino Code
Because the Sensor Shield is just a breakout board, you write code exactly as if you were interacting with a bare Arduino Uno.
#include <Servo.h>

Servo myServo;

void setup() {
  // If a servo is plugged into the D9 triplet on the shield,
  // it is effectively plugged into pin 9.
  myServo.attach(9);
}

void loop() {
  myServo.write(90);
  delay(1000);
  myServo.write(0);
  delay(1000);
}
Simulation Notes
- In the simulator, the Sensor Shield provides a massive array of connection points. You can connect it to an Arduino Uno object to gain access to the easily routable triplet blocks.