
MPU6050 IMU Sensor
A 6-axis motion tracking device that combines a 3-axis gyroscope and a 3-axis accelerometer on the same silicon die.
Component Preview
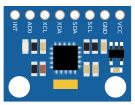 MPU-6050
The MPU6050 tracks linear acceleration and angular velocity. The on-board Digital Motion Processor (DMP) can fuse this data to provide precise roll, pitch, and yaw angles. In OpenHW Studio, the sensor features a Live Data HUD where you can manipulate forces and orientation in real-time.
SensorsIMUI2C
Overview
IMU stands for Inertial Measurement Unit. The MPU6050 measures acceleration in three axes (X, Y, Z) and rotation (gyroscope) in three axes (roll, pitch, yaw). It communicates using the I2C protocol, meaning it only requires two data pins.
Pin Reference
| Pin | Type | Description |
|---|---|---|
| VCC | power | Power supply (3.3V or 5V; breakout board has a regulator). |
| GND | power | Ground. Connect to Arduino GND. |
| SCL | input | I2C Clock. Connect to Arduino A5 (or dedicated SCL). |
| SDA | input | I2C Data. Connect to Arduino A4 (or dedicated SDA). |
| XDA | input | Auxiliary I2C Data (used to connect an external magnetometer). |
| XCL | input | Auxiliary I2C Clock. |
| AD0 | input | I2C Address Select. LOW = 0x68 (Default). HIGH = 0x69. |
| INT | output | Interrupt pin. Used when DMP data is ready (optional). |
Configurable Attributes
| Attribute | Type | Default | Description |
|---|---|---|---|
| accelX | number | 0 | Initial acceleration in the X axis. |
| accelY | number | 0 | Initial acceleration in the Y axis. |
| accelZ | number | 1 | Initial acceleration in the Z axis (gravity). |
| gyroX | number | 0 | Initial rotation in the X axis. |
| gyroY | number | 0 | Initial rotation in the Y axis. |
| gyroZ | number | 0 | Initial rotation in the Z axis. |
| temperature | number | 25 | Initial temperature in Celsius. |
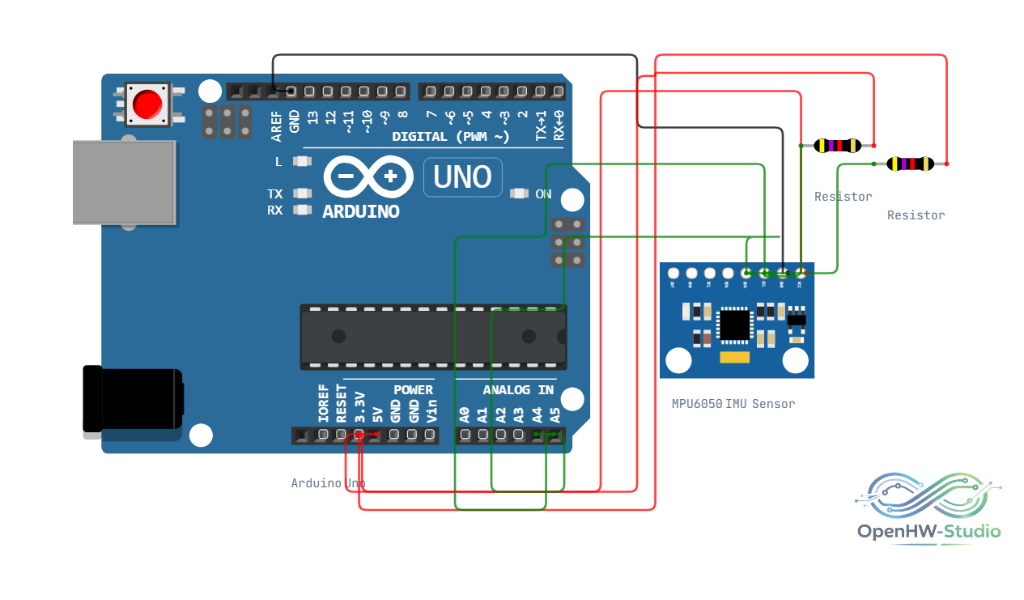
Wiring Diagram (Arduino Uno)
- Connect VCC to Arduino 5V.
- Connect GND to Arduino GND.
- Connect SDA to Arduino A4.
- Connect SCL to Arduino A5.
Example Arduino Code
Install the Adafruit_MPU6050 library via the Library Manager before running this sketch.
cpp
#include <Adafruit_MPU6050.h>
#include <Adafruit_Sensor.h>
#include <Wire.h>

Adafruit_MPU6050 mpu;

void setup() {
  Serial.begin(115200);

  if (!mpu.begin()) {
    Serial.println("Failed to find MPU6050 chip");
    while (1) {
      delay(10);
    }
  }

  Serial.println("MPU6050 Found!");

  // Basic configuration
  mpu.setAccelerometerRange(MPU6050_RANGE_8_G);
  mpu.setGyroRange(MPU6050_RANGE_500_DEG);
  mpu.setFilterBandwidth(MPU6050_BAND_21_HZ);
}

void loop() {
  /* Get new sensor events with the readings */
  sensors_event_t a, g, temp;
  mpu.getEvent(&a, &g, &temp);

  /* Print out the values */
  Serial.print("Acceleration X: ");
  Serial.print(a.acceleration.x);
  Serial.print(", Y: ");
  Serial.print(a.acceleration.y);
  Serial.print(", Z: ");
  Serial.print(a.acceleration.z);
  Serial.println(" m/s^2");

  Serial.print("Rotation X: ");
  Serial.print(g.gyro.x);
  Serial.print(", Y: ");
  Serial.print(g.gyro.y);
  Serial.print(", Z: ");
  Serial.print(g.gyro.z);
  Serial.println(" rad/s");

  Serial.print("Temperature: ");
  Serial.print(temp.temperature);
  Serial.println(" degC");

  Serial.println("");
  delay(500);
}
Simulation Notes
- In the simulator, right-click on the MPU6050 module to open its interactive 3D control panel. This allows you to smoothly adjust pitch, roll, and yaw during runtime to test your code's response to movement.