
LED
A basic Light Emitting Diode used as a visual indicator in electronic circuits.
Component Preview
 5mm LED
A standard light-emitting diode (LED). It emits light when sufficient current flows from the Anode to the Cathode. The color can be configured in the component attributes. Always use a current-limiting resistor (typically 220Ω for 5V) in series to prevent damage to the component.
Overview
LEDs are polarized components, meaning they only allow current to flow in one direction. The long leg is the Anode (positive), and the short leg is the Cathode (negative). If you connect them backwards, the LED will not light up.
Current Limiting
Unlike incandescent bulbs, LEDs have very little internal resistance once they turn on. If connected directly to a 5V power source, they will draw too much current and burn out. You must always place a resistor in series with the LED. A 220 Ω or 330 Ω resistor is standard for 5V circuits.
Pin Reference
| Pin | Type | Description |
|---|---|---|
| A | input | Anode (+). The longer leg. Connect through a resistor to a digital output pin or VCC. |
| K | input | Cathode (-). The shorter leg. Connect to Ground (GND). |
Configurable Attributes
| Attribute | Type | Default | Description |
|---|---|---|---|
| color | string | red | The color of the LED (`red`, `green`, `blue`, `yellow`, `white`, `orange`, `purple`). |
TIP
Simulator Tip: Use analogWrite(pin, value) on a PWM-capable pin (e.g., pins 3, 5, 6, 9, 10, 11 on the Arduino Uno) to control the brightness of the LED smoothly between 0 and 255.
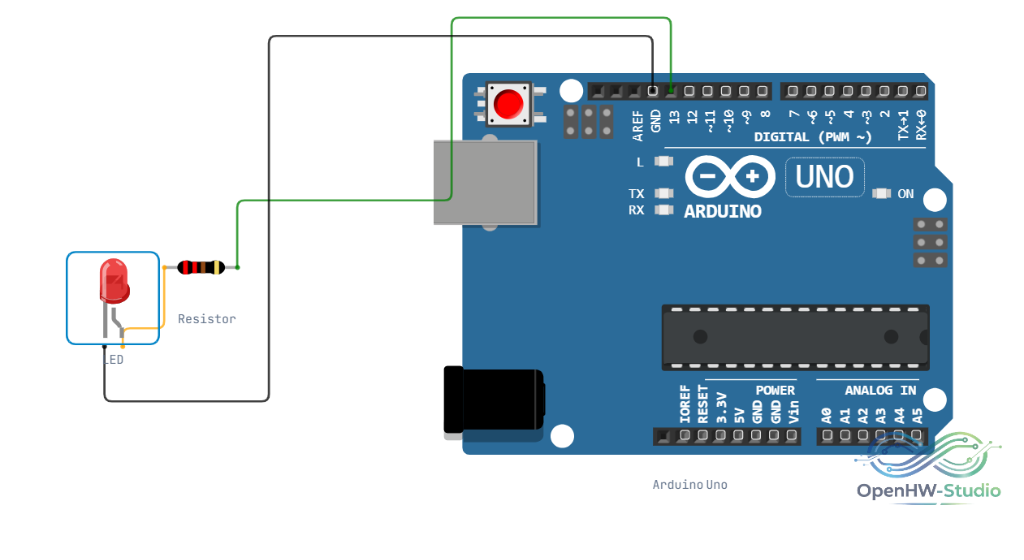
Wiring Diagram
Example Arduino Code
This classic "Blink" example demonstrates how to turn an LED on and off by setting a digital pin HIGH and LOW.
// Define the pin the LED is connected to
const int ledPin = 13;

void setup() {
  // Configure the pin as an output
  pinMode(ledPin, OUTPUT);
}

void loop() {
  digitalWrite(ledPin, HIGH);  // Turn the LED on
  delay(1000);                 // Wait for 1 second

  digitalWrite(ledPin, LOW);   // Turn the LED off
  delay(1000);                 // Wait for 1 second
}
Simulation Notes
- The LED will appear instantly "blown" (shattered icon) if you apply 5V across it without a resistor in the simulator.