
Membrane Keypad (4x4)
A thin, flexible 16-button keypad arranged in a 4x4 matrix, ideal for user input interfaces.
Component Preview
This membrane keypad provides 16 keys (0-9, A-D, *, #) wired in a 4-row by 4-column matrix. This clever wiring arrangement means you only need 8 microcontroller pins to read 16 individual buttons, rather than 16 pins.
Overview
Inside the keypad, pressing a button connects one of the Row pins to one of the Column pins. By rapidly scanning through the rows (setting one LOW at a time) and reading the columns, a microcontroller can determine exactly which button is pressed.
Pin Reference
The ribbon cable has 8 pins, typically mapped left-to-right (when looking at the front of the pad) as R1-R4, then C1-C4.
| Pin | Type | Description |
|---|---|---|
| R1 | passive | Row 1 (Top row: 1, 2, 3, A). |
| R2 | passive | Row 2 (Second row: 4, 5, 6, B). |
| R3 | passive | Row 3 (Third row: 7, 8, 9, C). |
| R4 | passive | Row 4 (Bottom row: *, 0, #, D). |
| C1 | passive | Column 1 (Left column: 1, 4, 7, *). |
| C2 | passive | Column 2 (Second column: 2, 5, 8, 0). |
| C3 | passive | Column 3 (Third column: 3, 6, 9, #). |
| C4 | passive | Column 4 (Right column: A, B, C, D). |
Configurable Attributes
This component has no standard configurable attributes.
Wiring Diagram
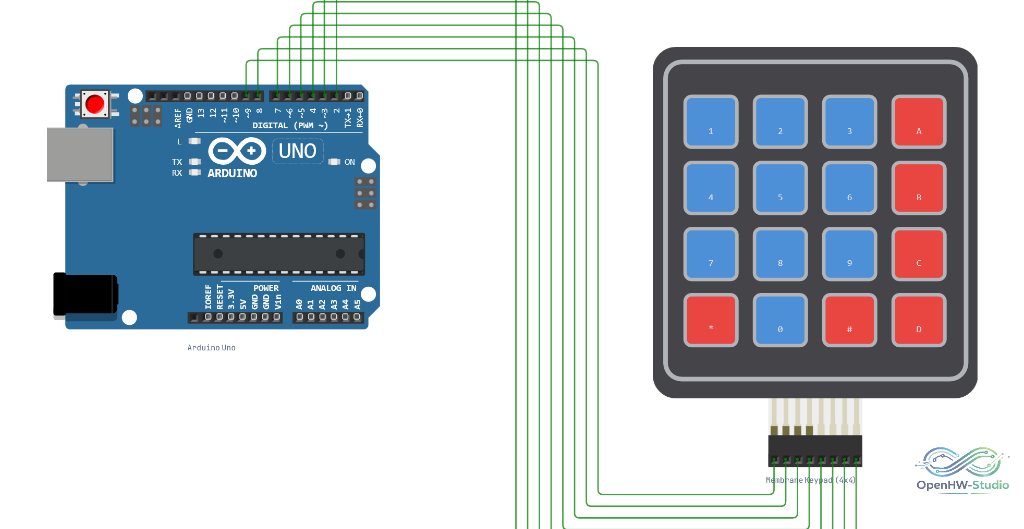
Example of connecting the Membrane Keypad (4x4) to an Arduino Uno.
Example Arduino Code
The Keypad library handles the complex matrix scanning automatically. Install it via the Library Manager.
#include <Keypad.h>

const byte ROWS = 4; // Four rows
const byte COLS = 4; // Four columns

// Define the Keymap
char keys[ROWS][COLS] = {
  {'1','2','3','A'},
  {'4','5','6','B'},
  {'7','8','9','C'},
  {'*','0','#','D'}
};

// Connect keypad ROW1, ROW2, ROW3 and ROW4 to these Arduino pins.
byte rowPins[ROWS] = {9, 8, 7, 6};

// Connect keypad COL1, COL2, COL3 and COL4 to these Arduino pins.
byte colPins[COLS] = {5, 4, 3, 2};

// Create the Keypad object
Keypad keypad = Keypad(makeKeymap(keys), rowPins, colPins, ROWS, COLS);

void setup() {
  Serial.begin(9600);
  Serial.println("Keypad Test Started");
}

void loop() {
  char key = keypad.getKey();

  // If a key was pressed, print it
  if (key) {
    Serial.print("Key Pressed: ");
    Serial.println(key);
  }
}
Simulation Notes
- In the simulator, you can click on the buttons of the keypad directly with your mouse to trigger keypresses.
- There is no need for external pull-up resistors; the Arduino's internal pull-ups (handled by the
Keypadlibrary) are sufficient.